
여행을 개발하다
[Java] Thread (스레드) 본문

1. 스레드의 정의
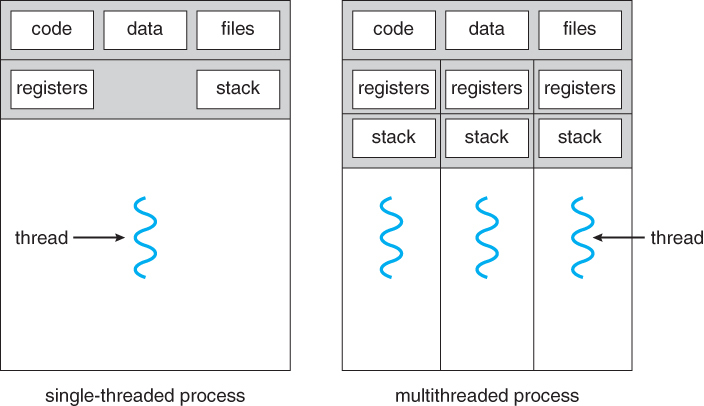
Thread(스레드)의 사전적 의미는 '프로세스 혹은 프로그램을 구성하는 흐름의 단위'이다.
프로세스나 프로그램은 하나의 단일 스레드로 구성되어 있을 수도 있고, 2개 이상의 여러 개의 스레드로 구성될 수도 있다. 전자를 싱글 스레드(Single Thread), 후자를 멀티 스레드(Multi Thread)라고 한다.
2. 스레드의 특징
스레드는 병렬성과 동시성이라는 특징을 갖는다.
① 병렬성(Parallelism)
다수의 코어가 각각에 할당된 스레드를 동시에 실행하는 특징
② 동시성(Concurrency)
하나의 코어에서 여러 개의 스레드가 동시에 실행되는 특징

3. 자바에서 스레드 구현하기
자바는 멀티 스레드(Multi-Thread) 프로그래밍이 가능한 언어로서, 컴퓨터가 동시에 여러 가지 일을 할 수 있도록 코드를 개행할 수 있다. 자바에서 스레드를 구현하기 위해서는 크게 다음의 2가지 방식을 사용할 수 있다.
방법 1. Thread 클래스를 상속한다.
방법 2. Runnable 인터페이스를 구현한다.
위 두 가지 방법을 각각 사용하여, 0부터 100까지의 숫자를 출력하는 단일 스레드를 구성해보려고 한다.
① Thread 클래스를 상속받는 방법
스레드를 사용하고자 하는 클래스에 Thread 클래스를 상속한 후, Thread 클래스의 run() 메서드를 오버라이드 한다. 이때, run() 메서드 안에 스레드에서 실행할 구체적인 내용을 적어주면 된다.
0부터 100까지의 숫자를 출력해 주는 내용을 적고, main 메서드에서 객체를 생성한 후, start() 메서드를 호출해 주면 된다.
public class ThreadExtends extends Thread {

	@Override
	public void run() {
		int i=0;
		while(i <= 100){
			System.out.println("i==>" + i);
			i++;
		}
	}

	public static void main(String[] args){
		ThreadExtends th1 = new ThreadExtends();
		th1.start();
	}

}
// 출력결과
i==>0
i==>1
i==>2
..........
i==>95
i==>96
i==>97
i==>98
i==>99
i==>100
② Runnable 인터페이스를 구현 받는 방법
Runnable 인터페이스를 사용하는 방법 또한 Thread 클래스를 상속받아 구현하는 방법과 크게 다르지 않다. run() 메서드를 강제로 오버라이드 해서 사용하면 되지만, 스레드의 객체를 생성하는 방법이 조금 다르다.
Thread 클래스의 객체를 생성하되, runnable 인터페이스를 구현한 클래스의 객체를 runnable target의 매개변수로 선언한다. 그 이후 start() 메서드를 통해 스레드를 시작하는 과정은 동일하다.
public class ThreadImplements implements Runnable {

	@Override
	public void run() {
		int i=0;
		while(i <= 100){
			System.out.println("i==>" + i);
			i++;
		}
	}

	public static void main(String[] args) {
         // Runnable Target으로 ThreadImplements의 객체를 넣어줌
		Thread th1 = new Thread(new ThreadImplements ());
		th1.start();
	}

}
아래처럼 Thread 클래스를 직접 뜯어보면, 내부적으로 runnable 인터페이스를 구현 받고 있는 것을 확인해볼 수 있다. 결국 runnable 인터페이스가 갖고 있는 왠만한 기능은 Thread 클래스도 갖고 있다는 이야기... 입맛에 맞게 원하는 방법으로 구현하면 될 것 같다.
public class Thread implements Runnable {
    /* Make sure registerNatives is the first thing <clinit> does. */
    private static native void registerNatives();
    static {
        registerNatives();
    }

    private volatile String name;
    private int priority;

    /* Whether or not the thread is a daemon thread. */
    private boolean daemon = false;

    /* Interrupt state of the thread - read/written directly by JVM */
    private volatile boolean interrupted;

    /* Fields reserved for exclusive use by the JVM */
    private boolean stillborn = false;
    private long eetop;

    /* What will be run. */
    private Runnable target;
......
}
3. 멀티 스레드(Multi Thread) 구현하기
여러 개의 스레드도 동시에 실행하여 멀티 스레드를 구현하는 것도 가능하다. 방법은 여러 개의 스레드 객체를 생성하여 동시에 start() 메서드로 실행해 주기만 하면 된다.
상단의 예제처럼 0부터 100까지 1씩 증가하는 내용의 스레드 객체 3개를 생성하여 실행해본다.
단, 어떤 어떤 스레드가 실행되는지 구분이 어려우므로 id를 각각 1,2,3으로 설정하여 console에 찍어본다.
public class MultiThread extends Thread {

	int id;

	public MultiThread(int id) {
		this.id = id;
	}

	@Override
	public void run() {
		int i=0;
		while(i < 100){
			System.out.println("id(" + this.id +"), i==>" + i);
			i++;
		}
	}

	public static void main(String[] args){
		MultiThread th1 = new MultiThread(1);
		MultiThread th2 = new MultiThread(2);
		MultiThread th3 = new MultiThread(3);

		th1.start();
		th2.start();
		th3.start();
	}

}
실행 결과 여러 개의 스레드가 동시에 실행되는 것을 확인할 수 있다.
id(1), i==>0
id(2), i==>0
id(2), i==>1
id(2), i==>2
id(2), i==>3
id(2), i==>4
id(2), i==>5
id(2), i==>6
id(2), i==>7
id(2), i==>8
id(2), i==>9
id(2), i==>10
....
4. 스레드 관련 메서드
① 스레드 스케줄링(Thread Scheduling)
* 우선순위 지정(setPriority(priority), getPriority())
싱글 스레드인 경우에는 무관하지만, 멀티 스레드 환경에서는 각 스레드 별로 실행 상의 순서를 정해야 할 상황이 올 수 있다. 이를 스레드 스케줄링(Thread Scheduling),이라고 하는데, 스케줄링 방법에는 우선순위를 지정하는 방법, Round Robin(순환 할당) 방법이 있다.
1. 우선순위 지정(Priority)
실행의 중요성 등을 고려하여, 선&후 순위를 지정하여 스레드를 실행하는 방식
2. 순환 할당(Round Robin)
스레드 간 우선순위의 설정 없이, 순서대로 시간 단위를 할당하여 실행하는 방식
Thread 클래스는 이중 우선순위 지정 스케줄링 방법을 지원하며, 이때 사용되는 메서드가 set, getPriority 메서드이다. 우선순위의 범위는 1부터 10까지의 정수이며, 별도의 설정을 하지 않으면 default 값인 5로 설정된다. 숫자가 10에 가까워질수록 우선순위가 높으며, 1에 가까워질수록 우선순위가 낮아진다.
setPriority(우선순위) - 우선순위 설정
setPriority 메서드에 우선순위로 설정하고자 하는 정수를 넣어주면 된다. 직접 숫자를 적어줘도 되고, thread 클래스에 상수로 정의된 값을 넣어줘도 된다. thread 클래스에 상수로 정의된 값은 3가지로 각각 (MIN_PRIORITY, 1), (NORM_PRIORITY, 5), (MAX_PRIORITY, 10)으로 매칭된다.
getPriority() - 우선순위 출력
스레드의 우선순위 값이 얼마로 설정될지를 가져오는 메서드다.
/**
 * The minimum priority that a thread can have.
 */
public static final int MIN_PRIORITY = 1;

/**
 * The default priority that is assigned to a thread.
 */
public static final int NORM_PRIORITY = 5;

/**
 * The maximum priority that a thread can have.
 */
public static final int MAX_PRIORITY = 10;
public class ThreadExtends extends Thread {
@Override
public void run() {
int i=0;
while(i < 100){
System.out.println("i==>" + i);
i++;
}
}
public static void main(String[] args){
ThreadExtends thread = new ThreadExtends();
System.out.println("Priority Initial ==>" + thread.getPriority());
thread.setPriority(Thread.MAX_PRIORITY); // 10
System.out.println("Thread.MAX_PRIORITY ==>" + thread.getPriority());
thread.setPriority(Thread.MIN_PRIORITY); // 1
System.out.println("Thread.MIN_PRIORITY ==>" + thread.getPriority());
thread.setPriority(Thread.NORM_PRIORITY); // 5
System.out.println("Thread.NORM_PRIORITY ==>" + thread.getPriority());
thread.setPriority(10); // 10
System.out.println("10 ==>" + thread.getPriority());
thread.setPriority(1); // 1
System.out.println("1 ==>" + thread.getPriority());
thread.setPriority(5); // 5
System.out.println("5 ==>" + thread.getPriority());
}
}// 실행 결과
Priority Initial ==>5
Thread.MAX_PRIORITY ==>10
Thread.MIN_PRIORITY ==>1
Thread.NORM_PRIORITY ==>5
10 ==>10
1 ==>1
5 ==>5
② 스레드 이름 설정 - setName(name), getName()
여러 스레드들을 구분하기 위해 스레드 이름을 설정하고, 출력해볼 수도 있다. 스레드의 이름 설정은 필수가 아니며, 직접 설정하지 않아도 내부적으로 자동 설정해 준다.
setName(스레드 이름 설정)
별도의 명시가 없으면 thread-0, thread-1, thread-2, thread-N...으로 이름이 설정된다. thread.setName(스레드명)으로 지정할 수 있다.
setName(스레드 이름 가져오기)
이름이 지정된 스레드는 thread.getName() 메서드를 통해 가져올 수 있다.
public class ThreadExtends extends Thread {

	@Override
	public void run() {
		int i=0;
		while(i < 100){
			System.out.println("i==>" + i);
			i++;
		}
	}

	public static void main(String[] args){

		ThreadExtends thread = new ThreadExtends();
		ThreadExtends thread2 = new ThreadExtends();
		ThreadExtends thread3 = new ThreadExtends();
		ThreadExtends thread4 = new ThreadExtends();

		// 별도의 설정이 없을 시에
		System.out.println("thread.getName()==>" + thread.getName());
		System.out.println("thread2.getName()==>" + thread2.getName());
		System.out.println("thread3.getName()==>" + thread3.getName());
		System.out.println("thread4.getName()==>" + thread4.getName());


		thread.setName("첫번째 스레드");
		thread2.setName("두번째 스레드");
		thread3.setName("세번째 스레드");
		thread4.setName("네번째 스레드");

		// 별도의 설정시에
		System.out.println("thread.getName()==>" + thread.getName());
		System.out.println("thread2.getName()==>" + thread2.getName());
		System.out.println("thread3.getName()==>" + thread3.getName());
		System.out.println("thread4.getName()==>" + thread4.getName());

	}

}
// 실행결과
thread.getName()==>Thread-0
thread2.getName()==>Thread-1
thread3.getName()==>Thread-2
thread4.getName()==>Thread-3
thread.getName()==>첫번째 스레드
thread2.getName()==>두번째 스레드
thread3.getName()==>세번째 스레드
thread4.getName()==>네번째 스레드
③ 데몬(Daemon) 스레드의 동작 여부 설정 - setDaemon(true|false)
데몬 스레드는 주가 되는 스레드를 돕는 일종의 조력자 역할을 하는 스레드를 의미한다.
주로 프로그램 혹은 스레드가 실행되는 백그라운에서 garbage collection과 같은 역할을 수행하며, 우선순위가 낮다. 조력자의 역할답게 주 스레드가 소멸하면 자연스럽게 함께 없어지는 특징이 있다.
이러한 데몬 스레드를 함께 실행할지 여부도 설정할 수 있는데, thread.setDaemon(ture|false)이라는 메서드의 매개변수로 true(실행)/false(실행하지 않음) flag만 바꾸어서 실행해 주면 된다.
public class ThreadExtends extends Thread {

	@Override
	public void run() {
		int i=0;
		while(i < 100){
			System.out.println("i==>" + i);
			i++;
		}
	}

	public static void main(String[] args){
		ThreadExtends thread = new ThreadExtends();
		thread.setDaemon(true);
		thread.setDaemon(false);
	}
}
④ 스레드의 상태 값 가져오기(getState())
getState() 메서드를 사용하면, 실행 중인 스레드의 상태 값도 출력해볼 수 있다.
public class ThreadExtends extends Thread {

	@Override
	public void run() {
		int i=0;
		while(i < 100){
			System.out.println("i==>" + i);
			i++;
		}
	}

	public static void main(String[] args){
		ThreadExtends thread = new ThreadExtends();
		System.out.println("Before Start==> " + thread.getState());
		thread.start();
		System.out.println("After Start==> " + thread.getState());
	}
}
지금까지 스레드의 정의, 자바에서 스레드(싱글&멀티)를 구현하는 방법과 연관 메서드들에 대해 알아보았다. 스레드는 비단 자바뿐만 아니라 cpu 등 컴퓨터 자원에 대해 공부할 때 매우 중요한 개념이라고 생각한다. 즉, 앞으로도 꾸준히 공부하고 많이 활용해 나가야 한다는 이야기...
긴 포스팅 읽어주셔서 감사합니다 : )
'BackEnd > Java' 카테고리의 다른 글
| [Java] Iterator(반복자) (1) | 2021.09.02 |
|---|---|
| [Java] Servlet, HttpServletRequest 인터페이스(Interface) (0) | 2021.08.27 |
| [Java] Wrapper Class(래퍼 클래스) (0) | 2021.08.04 |
| ArrayList (0) | 2019.05.15 |
| 인터페이스(Interface) (0) | 2019.05.14 |


